Have you been thinking about starting a blog, but have no idea where to begin? Then this article is for you!
This is a simple and quick do-it-yourself-in-a-day blog starter guide to get you up and running as well as info to get it looking like you! You know…all pretty and stuff!
So find a comfy seat and let’s get going!
Here is how to start a blog in one day:
Step 1: The pre-plan
It is first important to piece together what your blog will be. What is its purpose and how are you going to help others with it? A little pre-planning if you will.
Answer these questions to get you thinking about the big picture of why you want to start a blog in the first place. This will get you started on the right path and allow you to grow from there.
- What is my blog’s name?
- What is my blog’s niche?
- What categories/topics will I include in my blog?
- What kind of reader am I trying to attract/what problem(s) do I want to help them solve?
- What are my blog’s goals?
All done? Okay, great! Now on to the technical stuff. Don’t worry, it’s way easier than it seems.
STEP 2. Purchase Your Domain Name
Your domain name is your blog’s address. Mine is amyhatescarrots.com for example. So first begin by seeing if your ideal domain name is available. If not, you will have to get a bit creative and find something similar that you still love.
To make this process extra simple I use BlueHost for domain name purchase AND hosting [step 1 and 2]. A one stop shop. Use this link to get their best offer:

Go to the domain section on the BlueHost website and type in your ideal domain name to see if it is available and see what the cost is. Here’s what the page looks like:
STEP 3. Signup For Web Hosting
Once you own the domain you now need to setup a web host. Again, I use BlueHost for this. They offer a one click installation for WordPress, the platform I prefer, but you can also choose from other platforms such as Squarespace, Wix or WPEngine.
WordPress is technically free, unlike the monthly subscription required for the others, and super customizable so I always choose them over the others but feel free to look into the other ones if you prefer.
Please note that in order to have a functional website you must pay for website hosting. The smallest package from BlueHost will work just fine to begin.
STEP 4. Install WordPress
Alright, you’ve officially got your domain name and hosting! Now it is time to get your new site all setup. Login to your new BlueHost account and click on the hosting tab. There you will see the install WordPress under the website section [see image below].
Now, click on install and follow the instructions to install WordPress. It may take a few minutes.
Once installed it will give you credentials for your new website. Make sure to save this info. There is an admin URL that you use to login to your new site as well as the username and password information to gain access. Bookmark the URL and login for the very first time.
Hooray! You are now behind the scenes of your very own website! This is where you go to do all your editing and customization.
STEP 5. Install a WordPress Theme + Customize It
WordPress is full of fun and beautiful themes. You really could spend days, weeks, months looking through them all and changing your mind constantly. I suggest you find one that catches your eye, install it and keep it for a while. Otherwise, you spend a lot of time making your blog look ‘perfect’ and never actually getting any content completed.
Sooooo…have some fun and make it pretty but don’t worry about perfection. Customize it to fit your needs (fonts, color, layout etc) but remember – meaningful and rich content is what makes your blog a success not just appearance.
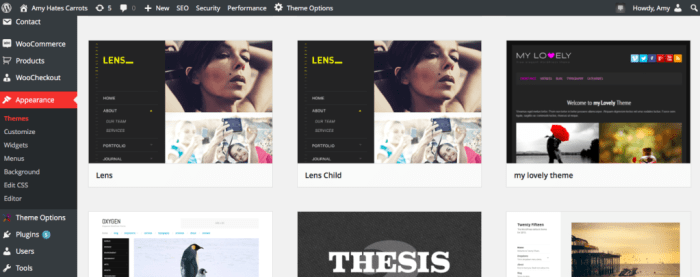
There are a bunch of free WordPress theme templates. Login and go to Appearances – Themes – Install Themes to see their options [see image below]. BlueHost also has some templates for purchase on their site.
The site I use to buy all my customizable themes is called Theme Forest. It has a TON of theme options that range in cost. Take a look and play around with the live previews to see all of the options each theme has and choose the best one for you. Then buy and install. Check out Themeforest here.
STEP 6. Add Some Plugins
If your theme doesn’t have certain customizable features you can always add special features through WordPress plugins. They are super handy! Just go to the plugin section on your WordPress dashboard and click on add new. Plug it in, plug it in. 😉
Here are some that I recommend:
YoastSEO – to get your site found and search engine friendly
Akismet – to block all the spam comments and emails
Popup Ally Pro – to create the perfect opt in form and gain followers aka the polite way to grow an email list
Sumo Me – to share your pages, posts and photos on social media easily
You did it!!! You now officially have a blog! Congrats you awesome new badass blogger you!
Cheers to taking a leap and trying something new!!!! I can’t wait to see all of the fabulous stuff you create!
*Happy Blogging M’Dear!* – Amy


ADD OR VIEW comments +
KEEP
reading
go back to the blog index >